Welcome to your new favorite art technique: transfers! Get Messy has partnered with the talented Tiffany Julie to bring you a course that is all about using transfers in your art journal pages to create depth and dreamy layers. To help you decide if this course is for you, Tiffany has created a really fun and simple transfer tutorial that will help you fall in love with image transfers. So grab your favorite image and let’s get started!
For this free lesson, we will be learning how to do an image transfer using clear packing tape. This is–in my opinion–the easiest image transfer technique to perform and great to add a little something different to your journals.
Supplies Needed:
- Clear packing tape
- Your choice of laser printed images
- Bowl of Water
- Paper towels
- Scissors
- Adhesive (glue sticks, tape runner, etc.)
First things first, I want to give you a little overview on what image transfers are and how to gather your supplies to perform one. Basically, an image transfer is when you transfer your chosen image from say a magazine or book onto the surface of your journal page. In order to do one, you’ll need a medium that will hold the ink from the original image allowing you to transfer it to your page. For this transfer we will be using clear packing tape.
To begin, chose the image you want to transfer. It is so important that the image is printed on a laser printer using toner. Inkjet prints won’t work because the ink used in Inkjet printers are water soluble. Once you apply water to an Inkjet printed image, the ink will run and ruin the transfer, unlike laser prints, which do not react to water in any way. So it is important to gather laser printed images to use for these transfers. Most official mass distributed publications are printed with toner. Some great publications to use would be books, magazines, sheet music, and maps. Images from magazines are the easiest to work with because magazine paper tends to be a lot thinner than other printed publications, making it super easy and quick to remove during the transfer.
So once you have your image and all of your supplies ready, you can begin the process of the transfer.
Process
First, trim down your image, removing all excess paper from around the image that you don’t want to transfer. Choosing images with a white background is great for transfers because the white doesn’t have any ink to transfer, therefore won’t affect the transfer in anyway.
![]()
Once your image is trimmed, take your clear packing tape and tape over the image. Make sure to cover the entire surface, overlapping the tape as you put it down.
When your image is covered in tape, trim away all excess tape.
![]()
![]()
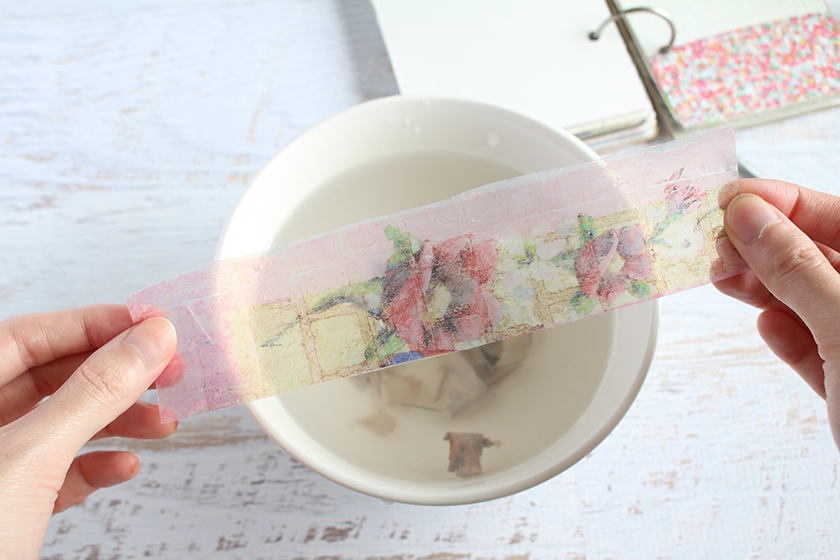
Now that you have your image covered in clear tape, take your bowl of water and submerge your image face-down into the water, so that the exposed back part of the image faces up. As the water begins to infuse the paper, you’ll begin to see your image peeking through the back.
![]()
Gently, begin to rub the paper away from the packing tape. To do this, press down with the tip of your nail until you create a tear in the paper. The water will turn the paper into pulp, so all you have to do is rub it all away.
![]()
If you successfully rubbed away all of the paper from the packing tape, you should be left with your image adhered lightly on the tape. It will be transparent until you lay it down onto your page.
![]()
Use a paper towel to dry the tape before adding it to your page.
![]()
Press your image down onto your page using the sticky side of the tape as your glue. Depending on what type of clear packing tape you use, once the tape is dry it should still be a little sticky. If you need more adhesive, a dab of glue from a glue stick should do the trick.
![]()
Once your image is down on your page, you should see it in full color! It will look a little distressed, but that’s the best part. It already gives your page a bit of character!
![]()
This transfer technique is a super quick way to get that distressed transfer effect in your art journals. Some fun ways to use this technique would be to create transparent pages or add transparent tip-ins to your journals. You can also use this technique to create little transparent windows in your pages too.
![]()
![]()
![]()
This free lesson is just a little teaser of how to create intricate pages using image transfers. When you purchase the full course, you will learn how to create image transfers using acrylic mediums and learn how to incorporate that transfer technique with paints, inks, collage, and gesso to create some really cool layered journal pages and spreads. We would love to have you join our class community and learn more about Transference with us. Join us today!
Transference Lesson Plan
![]()
![]()
![]()
![]()
![]()
![]()
![]()